
my tutorial ... the Hegoa jacket

Here is the illustrated photo tutorial for the "Hegoa" jacket pattern. I've taken the step-by-step explanations that come with the pattern and supplemented them with photos. In particular, I've re-explained the final lining sewing method, which can seem a bit complicated. With the photos (and some concentration!), I hope everything will seem simpler.
I apologize for the quality of the photos... I had an issue when taking pictures for the tutorial. So, I'm showing you how to assemble a very simple version, without pockets, ruffles, or a collar. I've taken a few photos of other versions (the test versions), and I'm using them for certain steps. In short, don't be surprised to see different fabrics in the tutorial photos.
The jacket pattern is available in the shop here.
Let's go!
STEP 1 - COLLAR PREPARATION
Before assembling the collars, add piping if desired. (A tutorial is available here to help you).
Sew the fabric collars right sides together with the lining collars as shown in the first photo.
Reduce seam allowances to 5 mm and carefully notch to get a nice curve. Turn right side out and press.

Place the collars on the fabric front top (lining side of the collars against the right side of the front top) and baste them at the shoulder and neckline with a 5 mm seam allowance from the edge. (in this photo, the top is already sewn to the bottom of the jacket, disregard this).

STEP 2 - SHOULDER RUFFLE PREPARATION
Sew the fabric ruffles right sides together with the lining ruffles along their curved sides, as shown in the next photo.

Reduce seam allowances to 5 mm and carefully notch the curves.
Turn right side out and press.

STEP 3 - POCKETS
Sew the fabric pockets right sides together with the lining pockets, leaving a 4 cm opening at the bottom of the pocket to turn it right side out.

Reduce seam allowances to 5 mm and carefully notch the curved edges. Turn right side out and press.
Close the openings left at the bottom of the pockets with small hand-stitched slip stitches.
Position the pockets at the indicated locations on the fabric jacket front bottom. To help you, you can cut out the pocket location shown on the paper pattern and place the pattern on the fabric piece.
Position the pockets in this way and fix them with pins or baste them.

Then sew them as shown in the photo with a 3 mm seam allowance along the sides and bottom of the pockets.

STEP 4 - JACKET PREPARATION
Sew the front top pieces right sides together with the front bottom pieces. You can add piping during these seams.

If you've added piping, press the seams upwards. Otherwise, press the seams open.
Topstitch 2 mm above the seams. (optional)

Sew the back top piece right sides together with the back bottom piece. You can also add piping during this seam.

If you've added piping, press the seam upwards. Otherwise, press the seam open.
Topstitch 2 mm above the seam. (optional)

Sew the front pieces right sides together with the back piece at the shoulders.

Press seams open.
If you have chosen the version with shoulder ruffles: gather the raw uncurved edges of the ruffles.

Position them on the armholes of the jacket, right sides together, distributing the gathers between the front top and the back top.
Baste the ruffles with a 5 mm seam allowance from the edge.

STEP 5 - SLEEVES
Sew the sleeves to the armholes of the jacket. To do this, start by gathering the sleeve cap to ease it in.

Then place the sleeves on the armholes of the jacket, right sides together,
over the ruffles if you've sewn them (the ruffles are sandwiched between the jacket and the sleeves).
Pin the non-gathered parts (i.e., between the ends
of the armholes and point F on the front, similarly at the back). Place the center of the sleeve cap at the shoulder seam and adjust the gathers.

Sew the sleeves in position.
STEP 6 - CLOSING THE JACKET SIDES
Place the front and back of the jacket right sides together.
Pin them, matching the armhole seams.
Sew each side from the sleeve end to the bottom of the jacket.

Press seams open.
STEP 7 - THE LINING
Sew the front top linings right sides together with the front bottom linings.
Press seams open.

Sew the back top lining right sides together with the back bottom lining.
Press seam open.
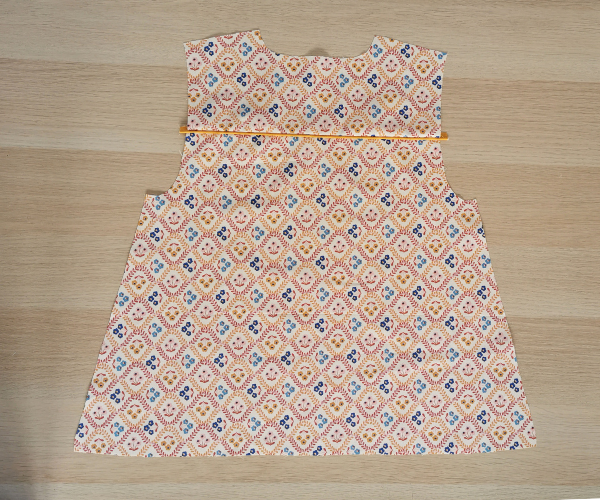
Sew the front linings and the back lining previously created right sides together at the shoulders.
Press seams open.

Assemble the sleeve linings to the armholes of the jacket lining, following the same procedure as in Step 5.
Sew the sides of the lining, assembling the front and back of the lining right sides together, from the sleeve end to the bottom of the jacket.
Be careful to leave a 15 cm opening in the seam of each sleeve
as shown in the photo.

Press seams open.
STEP 8 - ASSEMBLING THE JACKET AND ITS LINING
Turn the lining right side out and slip it into the jacket.
Position the lining and the jacket right sides together, making sure all seams match perfectly.
Pin all around the jacket: the neckline, both fronts, and the bottom of the jacket. If you chose the version with collars, these are sandwiched between the jacket and the lining.
Sew the jacket and its lining all around the neckline, both fronts, and the bottom of the jacket, leaving no opening.

Reduce seam allowances to 5 mm and make slits at the neckline.
Turn the jacket right side out by pulling the lining through one of the sleeves (not through an opening but through the end of a sleeve).

Tuck the lining into the jacket and tuck the sleeve linings into the sleeves. The lining and the jacket are thus placed wrong side against wrong side.

Press carefully, making sure the seams and corners are well defined.
STEP 9 - SLEEVE FINISHING
Turn the jacket inside out so that the lining is on the outside.
Place the end of the right sleeve and the end of the right sleeve lining against each other, ensuring that the sleeve has not twisted inside.
Baste the sleeve cuff and the lining cuff together at the sleeve seam, right sides together (2 or 3 basting stitches are enough). This ensures that the sleeves will remain well positioned against each other for the rest of the step.

Bring out the end of the sleeves through the 15 cm opening.
Pin all around the cuff right sides together (you can then remove the basting stitches) then sew the sleeve and its lining.

Reduce seam allowances to 5 mm and tuck the sleeve into the 15 cm opening.
Press carefully and close the 15 cm opening with a topstitch or small hand-stitched slip stitches.

Proceed in the same way for the left sleeve.
I made this short VIDEO during this step, I recommend watching it.
STEP 10 - BUTTONS AND BUTTONHOLES
Sew the buttonhole(s) on the right front of the jacket at points B indicated on the pattern. And sew the button(s) opposite on the left front.
Again, sorry for the poor quality photos. I hope this tutorial will allow you to sew the Hegoa jacket easily and with pleasure.
See you soon
Lydie
1 comment
Magnifique, très jolie petite veste