my tutorial ... the elaura skirt

Today, I'm presenting the photo-illustrated tutorial for the Elaura twirl skirt. As usual, I'll go over the step-by-step explanations that come with the pattern and supplement them with photos. With the diagrams + photos, you should be able to sew the skirt without any problems!
The pattern is available in the shop here.
Let's get started!
STEP 1 - THE POCKETS
You'll start by making and assembling the pockets. If you choose to sew a simplified version of the skirt, without pockets, skip directly to step 2.
Otherwise, start by attaching the piping to the straight line and the rounded edge of each pocket. Attaching the piping is not mandatory, but it highlights the pockets. For help, you can consult my article on sewing piping by clicking here.

Then, assemble the pockets, right sides together, two by two: sew the straight line of the pocket opening and the rounded edge. Do not sew the top or the side.

Reduce the seam of the rounded edge to 5 mm and notch it.
Then turn the pockets right side out.

Press carefully and topstitch the pocket edge 2 mm from the edge.

If you haven't overcast the sides of the pockets, overcast them now.
Position the pockets on the right side of the front skirt at the P points indicated on the pattern, aligning the side and top lines of the skirt.
After carefully pinning them, baste the sides and top of the pockets and attach the pockets with a stitch 2 mm from the rounded edge.

Your pockets are now finished.
STEP 2 - BELT LOOPS AND WAISTBAND
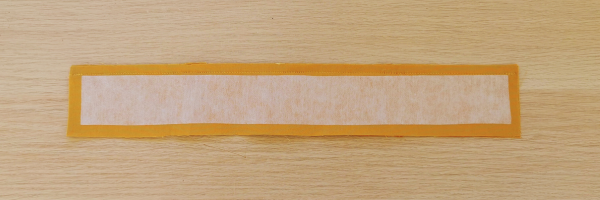
To stiffen the waistband, iron the fusible interfacing, centering it on the wrong side of the front and back waistbands and their facings. (The seam allowances are not interfaced, which is why 1 cm of fabric is not interfaced all around the waistbands).

Assemble the belt loops, two by two, right sides together.

Reduce the seams to 5 mm, turn right side out and press.
Topstitch 2 mm from each edge. (optional)
You will now have 5 belt loops.

Position the belt loops on the right side of the waistbands, centering them at the C points indicated on the pattern, and baste them 5 mm from the top and bottom edges of the front and back waistbands.

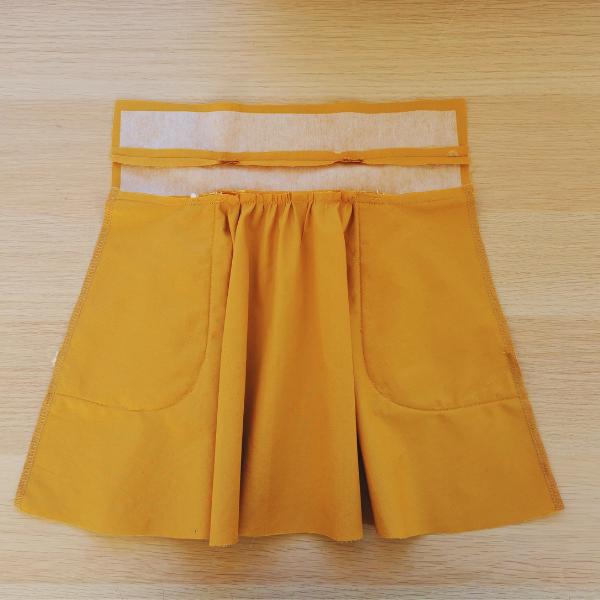
STEP 3 - ASSEMBLING THE FRONT OF THE SKIRT
Assemble the top of the front waistband and its facing (pieces #1), right sides together, along their entire length. The belt loops are "caught" between the two waistbands.

Reduce the seams to 5 mm and press open.

Gather the center of the front skirt, between the 2 pockets (you can consult the tutorial available on the blog for nice gathers).

Assemble the bottom of the front waistband and the front skirt, right sides together.
Press the seams up.
You should have a skirt front as shown in the photo.

STEP 4 - ASSEMBLING THE BACK OF THE SKIRT
The back assembly is similar to the front.
Assemble the top of the back waistband and its facing (pieces #2), right sides together, along their entire length.
The belt loops are "caught" between the two waistbands.
Reduce the seams to 5 mm and press open.

Assemble the bottom of the back waistband and the back skirt, right sides together.
Press the seams upwards.
And you'll have a skirt back as shown in the photo.

STEP 5 - ASSEMBLING THE SKIRT
Place the skirt front made in step 3 and the skirt back made in step 4 right sides together, making sure to align the side seams between the waistband and the skirt.
Assemble each side from the top of the waistband lining to the bottom of the skirt.
Press the seams open.
STEP 6 - WAISTBAND FINISHES
Press a 1 cm fold towards the wrong side at the bottom of the lining.

Tuck the waistband lining inside against the wrong side of the waistband.
Press and pin or baste the bottom of the lining all around to hold it securely in place.
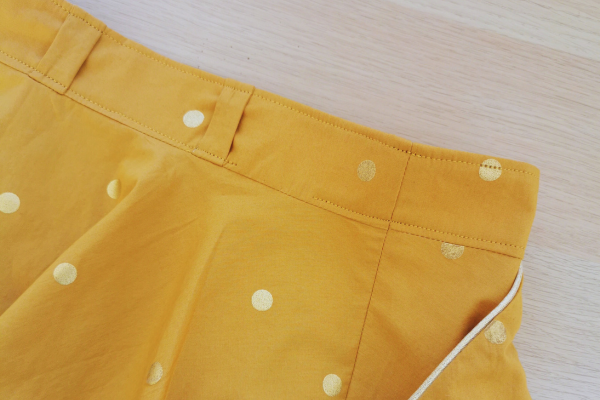
Then topstitch the top of the waistband, all around, 3 mm from the edge (passing over the belt loops).

Then topstitch the bottom of the waistband 3 mm from the edge (passing over the belt loops)
Do not sew all the way around; leave a 5 cm opening on one of the back sides.
This opening allows you to slip the elastic into the casing you've created.
Thread the elastic through the opening left in the waistband and close the elastic.
To close the elastic, overlap the ends by 2 cm and secure them with your machine's zigzag stitch.

Close the opening by finishing the topstitching at the bottom of the waistband in line with the previous stitching.
STEP 7 - SKIRT FINISHES
Press a first 1 cm fold at the bottom of the skirt.
Press a second fold and secure it with a stitch 2 mm from the top of the fold
or with small invisible hand-stitched stitches.
Sew the decorative buttons to the front of the skirt, at the B points indicated on the pattern.
And your skirt is finished!
"Share your creations on social media with the hashtags #jupeelaura and #louandmecouture"
1 comment
Très joli jupe