
My tutorial ... my Milia blouse or dress

Today I'm offering you the photo-illustrated tutorial that will help you create the Milia pattern in its long-sleeved dress version.
It complements the step-by-step instructions provided with the pattern available in store here: Milia blouse pattern.
I will try to offer a supplement to this tutorial soon for the blouse version and the short-sleeved ruffled version.
As usual, I'm reviewing the steps and explanations from the step-by-step instructions so you can follow them along with this tutorial.
Let's go!
STEP 1 - THE TOP OF THE BLOUSE OR DRESS
Place the front top and back tops right sides together and assemble them at the shoulders.

Press the seam open. Don't skip this step "to save time"; you'll find that the result is much higher quality when you press the seams as you go along.
Next, assemble the front facing and back facings right sides together at the shoulders.

And press the seam open.
Place the facing on the top of the blouse, aligning the pieces carefully.
Then sew the blouse and the facing together with a seam all around the neckline and each back height.
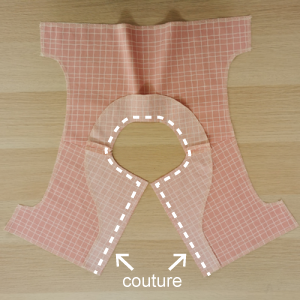
Trim the seam allowance to 5 mm and make slits all around the neckline.
Turn right side out and press.
To keep the facing in place, I recommend topstitching along the shoulder seams, catching both the blouse and the facing. By stitching on the shoulder seams, this seam will be barely visible, if at all.

Sew the 4 buttonholes on the right side of the back and the 4 buttons on the left side. Be careful to place the buttonholes correctly; they are placed on the pattern including seam allowances.

Overlap the back tops by 3 cm, close the buttons, and pin the bottom edges together. Then baste them with a seam 5 mm from the edge.

STEP 2 - ASSEMBLING THE BLOUSE OR DRESS

And gather the back bottom.

Assemble the front top and the front bottom right sides together.
And assemble the overlapping back tops and the back bottom right sides together.
Here's what you get:

Press the seams upwards.
STEP 3 - THE SLEEVES
Gather the bottom of the sleeves.

Assemble the sleeves to the cuffs right sides together.

Press towards the cuffs.
Then, assemble the sleeves to the armholes right sides together.
(I'm preparing a tutorial that will help you attach a sleeve with ease or gathers. As soon as it's ready, I'll add the link here)
Here's what you get:

Press, laying the seams towards the sleeves.
STEP 4 - CLOSING THE SIDES OF THE BLOUSE OR DRESS
Place the front and back of the blouse right sides together.
Pin them, aligning the seams carefully (those of the cuffs, armholes, and between the top and bottom of the blouse).
And close each side from the end of the sleeves to the bottom of the blouse.

Press the seams open.
STEP 5 - SLEEVE FINISHES
First, press a 1 cm fold at the end of the cuffs.

Then, press a 1.5 cm fold and secure the cuff inside with small hand-sewn stitches or by stitching 2 mm from the edge of the cuff.

STEP 6 - THE BOTTOM RUFFLE
Assemble the bottom ruffles of the dress right sides together on each side.

Press the seams open.
Hem the ruffles: to do this, press two 1 cm folds at the bottom of the ruffle and secure it with a seam 2 mm from the edge.

If you prefer to adjust the dress length on the child, you can hem at the end of this step.
Gather the ruffle.

And attach it to the bottom of the blouse right sides together.

Press upwards.
Here's what you get.

Your dress is finished!
To make it, the pattern is available in store here: Milia blouse pattern.
See you soon.
Lydie