my tutorial... edelweiss mittens

Here is the step-by-step guide for the free Edelweiss mitten pattern, which is available in our shop here.
The instructions here are illustrated with photos in addition to the diagrams in the step-by-step guide that comes with the pattern.
STEP 1 - PREPARING THE MITTENS
Place the lower part of the mitten's underside and the upper part of the mitten's underside right sides together. Sew the thumb up to point B indicated on the pattern.

Fold the ribbons in half and baste them to each side of the mitten top at points A and A’ indicated on the pattern.


Sew a button in the center of each fabric mitten, between points A and A’.

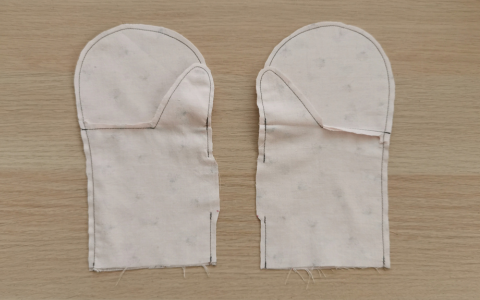
Next, place the top and bottom sections of the mittens, previously made, right sides together as follows:
Start sewing from point C indicated on the pattern, upwards towards the top of the mittens. Stop sewing at point B, fold the thumb down, and resume sewing from point B to point D.

The loops formed by the ribbons are "caught" between the two layers of fabric during this seam.
Reduce the seam allowances to 5 mm and clip the rounded edge of the mittens. Also, reduce the seam allowances between pieces #2 and 3 to 5 mm.
Make a slit at the corner of the thumb and clip the rounded part of the thumb.
STEP 2 - PREPARING THE LININGS
Place the linings of the lower part of the mitten's underside and the linings of the upper part of the mitten's underside right sides together, as in the first step.

Place the mitten top linings and the mitten bottom linings, previously made, right sides together as follows:
Start sewing from point C, towards the top of the mittens, up to point B, leaving an opening at the location indicated on the pattern. Fold the thumb down and resume sewing from point B to point D.
Reduce all seam allowances to 5 mm around the entire mitten. Also, reduce the seam allowances between pieces #2 and 3 to 5 mm.
Make a slit at the corner of the thumb and clip the rounded part of the thumb.
Turn right side out.
STEP 3 - ASSEMBLING THE MITTENS AND THEIR LININGS
Insert the linings into the mittens. The mittens and their linings are placed right sides together.
Make sure to place the lining of the right mitten into the right fabric mitten and the left lining into the left mitten.


Sew the mittens and their linings together with a seam around the entire wrist.
Reduce the seam allowances to 5 mm and turn right side out through the opening left in the lining.

Press and close the opening with small hand stitches.
Slip the ribbons into the button to tighten the wrist.

And there you have it, your finished mittens!
If you make these mittens, don't forget to share your creations on social media with the hashtags #mouflesedelweiss and #louandmecouture.
See you soon,
Lydie