My tutorial... my Lorea ruffled blouse

To supplement the step-by-step instructions provided with the pattern (available in our shop here: Lorea blouse pattern), here is the illustrated tutorial with photos that will help you make the blouse or dress without difficulty!
I am reviewing the steps and explanations of the step-by-step guide so you can follow them along with this tutorial.
STEP 1 - THE PLEATS
To begin, you will form the front pleats of the blouse by following the lines indicated on the pattern.
To easily transfer the pleat lines to the fabric, I recommend cutting the paper pattern lines. You can then fold them and trace them onto the fabric.
You can trace the lines on the wrong side of the fabric with chalk or an erasable pen, depending on the fabric used (or use your usual technique).


I recommend doing it pleat by pleat, one after the other. It will be simpler.
Sew along the height of the pleats, making sure to backstitch at point B to reinforce the seam. Otherwise, your seam may unravel with use.
Press the pleats, laying them towards the sides of the blouse.

Once the 4 pleats are made, baste them with a seam 5 mm from the top of the blouse to maintain their orientation: the two right pleats are oriented towards the right side of the blouse, the two left pleats towards the left side.

STEP 2 - SHOULDER SEAMS
Position the front and back pieces of the blouse right sides together and join them at the shoulder seams.
Don't forget to press the seams open.

Similarly, position the front facing and the back facings right sides together and join them at the shoulder seams.
Press the seams open.

STEP 3 - THE COLLAR
Join the collar pieces right sides together, two by two, as shown in the photo, meaning all the way around except for the neckline.

Take the time to notch carefully to get a nice curve.
Turn them right side out and press.

The collars are ready; you can position them on the blouse's neckline, centering them on each side of the front center.
Baste them with a 5 mm seam from the edge.

STEP 4 - THE RUFFLES
To "finish" the edges of the ruffles, you can sew a narrow hem.
In this case, start by stitching 5 mm from the outer edge of the ruffles.

Press by folding these 5 mm of fabric inwards (gently "roll" the fabric and fold it at the stitching line).
Press a second 5 mm fold inwards and secure it with a seam 3 mm from the edge or with small invisible hand-stitched stitches.


Instead of this hem, you can make a rolled hem with a serger. In this case, remember to remove 1 cm from the entire outer side of the ruffles to match the width provided in the pattern.
Once the hems are done, place the small ruffles on the blouse armholes, right sides together, with the middle of the ruffles at the shoulder seam.
Baste them with a 5 mm seam from the edge.

Be careful not to catch the collars in this seam; remember to fold them towards the neckline.
Then place the large ruffles on the blouse armholes, right sides together, over the small ruffles, with their center at the shoulder seam.
Baste the large ruffles in position with a 5 mm seam from the edge.
Again, be careful not to catch the collars in this seam; remember to fold them towards the neckline.

STEP 5 - ASSEMBLING THE BLOUSE AND THE FACING
Position the blouse and its lining right sides together, aligning the shoulder seams.

Join them only at the neckline and armholes.
For this, I advise you to proceed in several steps:
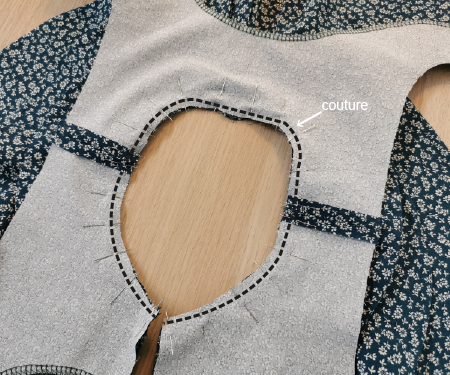
First, assemble the neckline, being careful not to catch the ruffles in the seam. Note that you are not joining the center back of the blouse and the facing, but only the neckline circumference, like this:
Then fold the ruffles and collars inward between the blouse and its lining, being careful to fold them close to the neckline so as not to catch them in the armhole seam.
Then, assemble the armholes one by one.

The ruffles and collars are oriented inward, "sandwiched" between the blouse and its lining.
Trim the seams to 5 mm and make slits at the armholes and neckline.
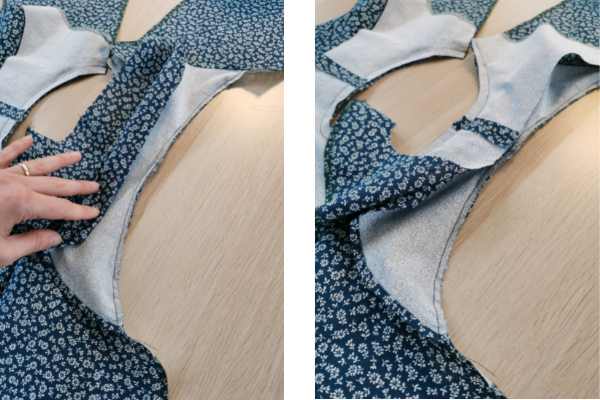
Then turn it right side out by pulling each back piece through the shoulders: gently pull on the collars and ruffles, and the rest will follow.

Press carefully, making sure the seams lie flat.
Then join the front and back of the blouse right sides together at the side seams: place the back pieces of the blouse against the front of the blouse. Place the back facings against the front facing and align the armhole seams (the seam between the blouse and the facing).
Sew each side of the blouse, and in extension, sew the facing.

Press the seams open and tuck the facing inside the blouse.
To keep the facing in place, I recommend securing it on each side by stitching on the side seams.

Finally, close the back of the blouse by placing the back pieces of the blouse right sides together: start by aligning the seam between the blouse and the facing, then place the back pieces of the blouse against each other and the back facings against each other.
You join the center backs of the blouse, and in extension, you sew the facings.

Tuck the facing inside the blouse.
To keep it well in place, I recommend securing it by stitching on the back seam, as you did to keep it on the sides of the blouse.
You can also make a few stitches on the front, catching the facing and the blouse at the pleats, so that the stitches are not visible on the outside of the blouse.
STEP 6 - HEMMING THE BOTTOM OF THE BLOUSE
Before sewing the hem, I recommend trying it on to adjust the length of the blouse or dress.
Press a 1 cm first fold at the bottom of the blouse. Press a second 1 cm fold and secure it with small invisible hand-stitched stitches or with a seam 2 mm from the edge of the fold.

There you have it, your blouse is finished!
Feel free to share your creations on social media with the hashtags #blouselorea, #robelorea, and #louandmecouture.
The pattern is available in the shop here: Lorea blouse pattern
See you soon
Lydie
2 comments
Voilà je viens de faire cette jolie blouse pour ma petite fille. Magnifique. Merci pour le patron.
Bonjour,
CodialementJe voudrai réaliser ce modèle avec les manches longues, mais dans le guide je n’ai pas vu a quel moment je dois coudre celles ci
Je vous remercie pour votre réponse