My tutorial... my Nahia puff-sleeve blouse

Today, I'm offering you the tutorial for the Nahia blouse, for which the pattern is available in the shop here.
As usual, I'm following the steps as they are presented in the step-by-step guide that accompanies the pattern, so you can follow along with both the illustrated instructions and the photos.
Let's go!
STEP 1 - CLOSING THE BACK
Before you begin, you need to choose the closure you want for the back of the blouse:
If you choose to close the back with a fabric loop, you must start making the blouse with this step.
If you choose to close the back with an embroidered loop, it will be made at the end. In this case, skip this first step.
To make the fabric loop, fold the back closure loop in half, right sides together lengthwise, and stitch 1 cm from the edge.

Trim the seam, turn right side out, and press.
You should have a rectangle 1 cm high and 7 cm wide.
Fold the loop and place it in the middle of the back of the blouse, 2 cm from the top, on the slit line, as indicated in the photo.
The loop should extend 1 mm beyond the slit line to be "caught" in the seam in step 2 of making the blouse.
Secure it so that it stays in place when sewing the slit.

All that remains, at the end of making the blouse, is to sew a button opposite it on the right side.
STEP 2 - THE TOP OF THE BLOUSE
Place the front and back of the blouse right sides together and assemble them at the shoulder seams.

Press the seams open.
Place the front facing and the back facing of the blouse right sides together and assemble them at the shoulder seams.

Press the seams open.
Place the facing on the blouse, right sides together, matching the necklines and shoulder seams.
Assemble them around the neckline:
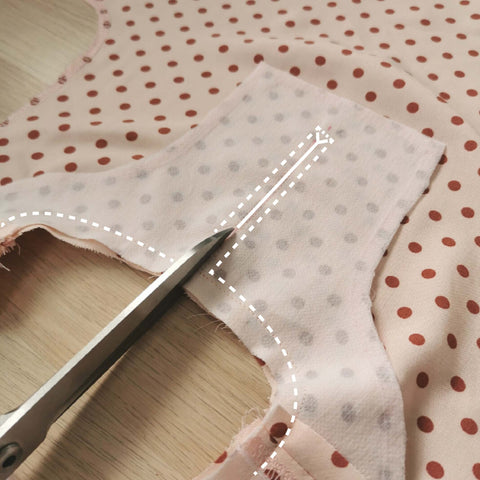
At the back, stitch as indicated in the photo to create the slit:
In the middle of the back, stitch down 1 mm before the "slit line,"
At point F indicated on the back facing pattern, make two or three horizontal stitches (depending on the stitch length used)
Then stitch back up 1 mm on the other side of the "slit line"
And continue stitching around the neckline.

If you have chosen to close the back with a fabric loop, it is "caught" in the slit seam. Be careful to only "catch" the loop in the seam on the left side of the loop. Remember to backstitch several times at the loop to reinforce the seam.
Reduce the seams to 5 mm, make snips all around the neckline and cut the back slit as indicated in the photo up to point F.
Take the time to properly reduce the seams to get a nice slit.
Turn the facing inside the blouse and press carefully. Do not hesitate to re-snip if necessary for a neat finish.
To keep the facing in place, topstitch over the shoulder seams, catching both the blouse and the facing in the stitching.

If you added the fabric loop in step 1, I recommend topstitching at the loop to reinforce the seam.
STEP 3 - THE SKIRTS
You need to gather the front and back skirt pieces of the blouse until they match the width of the front and back pieces to which they will be attached.
Place the front skirt on the top front, right sides together, and assemble them.

Similarly, place the back skirt on the top back, right sides together, and assemble them.

Press the seams up towards the top of the blouse.
STEP 4 - THE SLEEVES
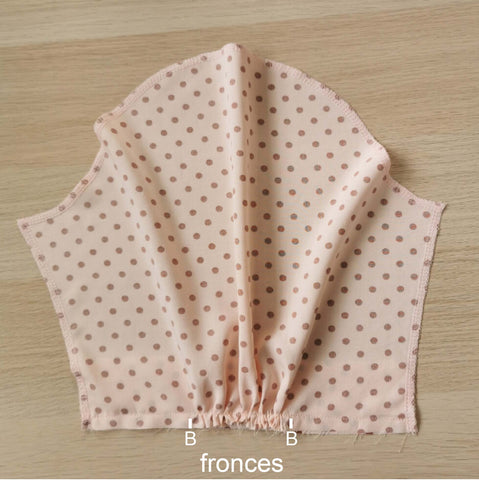
You need to gather the bottom of the sleeves between points B indicated on the pattern until they match the width of the sleeve cuffs.
Attach the sleeves to the cuffs, right sides together.

Press the seams towards the cuffs.
Gather the sleeve caps between points M indicated on the pattern until they match the width of the blouse armholes.

I recommend starting by basting the gathering threads between points M, placing the sleeve caps on the armholes, right sides together, and pinning the ungathered parts (i.e., between the armpit and point M on the front side, and similarly on the back). Place the center of the sleeve cap at the shoulder seam, then adjust the gathers.
Attach the sleeves to the armholes in this way, right sides together.

Press the seams towards the sleeves.
STEP 5 - CLOSING THE SIDES OF THE BLOUSE
Place the front and back of the blouse, right sides together, and pin them, making sure the seams (those of the sleeve cuffs, armholes, and between the top and the skirt) match up perfectly.
Close each side from the end of the sleeves to the bottom of the blouse.

Press the seams open.
STEP 6 - THE SLEEVE CUFFS
Press a 1 cm seam allowance at the end of the sleeve cuffs.

Fold the cuff in half inwards and press.
Finally, close the cuff all the way around with small, invisible hand stitches.

You can also secure the cuffs by topstitching all around the cuffs, 2 mm from the edge.
STEP 7 - THE HEM OF THE BLOUSE
Press a 1 cm hem at the bottom of the blouse.
Press a second 1 cm hem and secure it with small, invisible hand stitches.
You can also secure the hem with a stitch 2 mm from the edge of the fold.

STEP 8 - CLOSING THE BACK OF THE BLOUSE
If you have chosen to close the back with a fabric loop, you must sew the button opposite the loop on the right side.
If you have chosen to close the back with an embroidered loop, embroider a loop using a blanket stitch or chain stitch on the left side of the slit, 1 cm from the finished top of the blouse. (You can easily find many embroidered loop tutorials online).
Then sew a button opposite it on the right side.
Your beautiful Nahia blouse is now finished. I hope this tutorial helped you make it. If you want to get started, the pattern is available in the shop here.
Lydie