My tutorial... my Enea tie-front blouse

Here is the photo-illustrated tutorial, as promised, which takes up the explanations for the Enea blouse pattern (the pattern can be found in the shop here: Enea blouse pattern ).
I will go over the steps of making it, one by one, as explained in the step-by-step guide that comes with the pattern.
STEP 1 - THE FRONT OF THE BLOUSE
You form the round pleat at the front: the right side of the fabric is visible on the outside here.
You stitch along the dotted line marked "fold line" along the entire height of the blouse.

You press the pleat by placing the "center line" of the blouse on the "fold line".
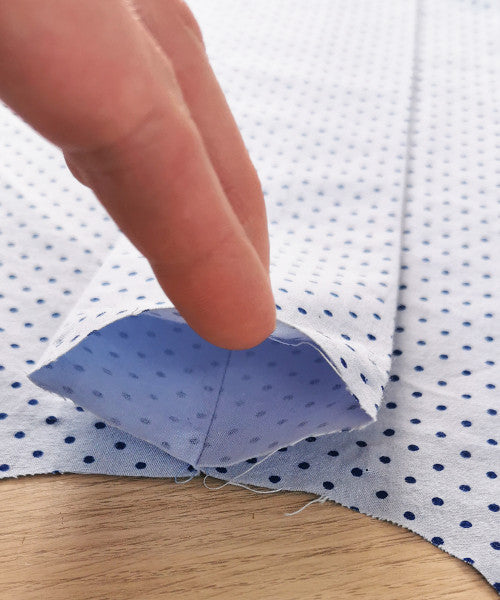
And you secure the pleat at the top and bottom of the blouse with a seam 5 mm from the edges.

STEP 2 - SHOULDER SEAMS
You assemble the front and back of the blouse right sides together, at the shoulder seams. And remember to press the seams open.

You assemble and press the front and back of the facing in the same way.

STEP 3 - THE CAP SLEEVES
You need to sew a hem on the outer edges of the cap sleeves.
To do this, I advise you to start by stitching 5 mm from the outer edge (the rounded edge) of the cap sleeves. This is a technique I also use to sew hems on rounded dress or skirt bottoms.

You press, folding these 5 mm of fabric inwards: you "roll" the fabric and fold it at the previously made stitch line.

You press a second 5 mm fold inwards and secure it with a seam 3 mm from the edge.


If you prefer, you can also use a serger to create a rolled hem instead of this hem. In this case, you can remove 1 cm from the entire outer side of the cap sleeves to maintain the intended width.
Gather the cap sleeves along the entire height of the unrounded edge.

And you position the cap sleeves right sides together on the armholes of the blouse, between the M points indicated on the pattern.
Baste the cap sleeves in this position with a seam 5 mm from the edge.

STEP 4 - ASSEMBLING THE BLOUSE AND THE FACING
To assemble the facing and the blouse, place the blouse and its lining right sides together, making sure the shoulder seams align.
You should only assemble them at the armholes, the neckline, and the two back center heights.
I advise you to proceed in several steps: first, assemble the neckline, being careful not to catch the cap sleeves in the seam, and then sew each back center height.

then you assemble the armholes one by one (the cap sleeves are oriented inwards, "caught" between the blouse and its lining).

After reducing the seams to 5 mm and making slits at the armholes and neckline, turn it right side out by passing each back through the shoulders as shown in the photo.

Press carefully, making sure the seams stand out well.
Here's what you get (view from the wrong side of the blouse):

You must now close the sides of the blouse:
you start by placing the front and back of the blouse right sides together, making sure the armhole seams (the seam between the blouse and the facing) match up. And you place the back facings against the front facing.
You assemble the blouse on each side and, in extension, you assemble the facing.


You press the seams open.
To ensure the facing stays in place, I advise you to secure it on each side by stitching along the side seams.

STEP 5 - THE BLOUSE BOTTOM FACING
You assemble the back facings and the front facing right sides together at the side seams, then press the seams open.

Press a 1 cm turn-up along the entire length of the top of the facing; this will simplify sewing it later.

You place the facing on the bottom of the blouse, right sides together, making sure to align the side seams and the ties by pinning them.
On each side of the back, you must first fold the back facings over the back of the blouse (you need to pass the back facings from the inside to the outside of the blouse), right sides together, then place the bottom facing on top.
You need to stitch 1 cm from the edge along the entire length of the bottom facing of the blouse.

Reduce the seams, make slits at the ties, cut the corners, and fold the bottom facing of the blouse inwards.
Press carefully, making sure the seams stand out well.
Finally, you need to secure the facing along its entire length: either with an invisible stitch or by stitching 2 mm from the top edge of the facing.

STEP 6 - BUTTONS AND BUTTONHOLES
The backs overlap by 3 cm.
Sew the buttonholes in pairs on the right side of the back:
you must sew the first buttonhole 1 cm from the top,
the second 2 cm from the first,
then distribute the following ones, two by two, at the same distance from each other down to the bottom.
Sew the buttons opposite on the left side of the back.
You can also, as I have done here, replace the buttons/buttonholes with snap fasteners.

I hope that making the blouse seems simpler with these few details and photos. Do not hesitate to contact me if you need further explanations.
See you soon,
Lydie
4 comments
Bonjour, je viens de commencer votre patron Enea et je voulais savoir si on doit entoilé les parmenture? Merci d’avance et belle journée.
Bonjour j’ai acheté le patron et je m apprête à la réaliser j’ai une question dois-je mettre du thermocollant à la parmenture. Qu’en pensez-vous ?
Je viens de terminer cette adorable petite blouse sans aucun problème. merci beaucoup, le tuto est parfait.
Par contre, c’est dommage que le patron n’existe pas en 2 ans et je ne suis pas assez douée pour en faire un. Pourriez-vous me conseiller? Jade, la petite soeur de Lou serait heureuse d’avoir la même blouse que sa grande soeur et je pense que j’ai suffisamment de tissu. Merci beaucoup.
Marie-Noëlle
bonjour,
j’ai réalisé ce modèle en broderie anglaise en taille 12 ans. Les explications sont très claires je n’ai donc eu aucune difficulté pour le réaliser. Je suis assez fière du résultat moi qui ne suis qu’une couturière débutante.
Le modèle a tellement plu a ma petite fille qu’elle me demande le même modèle… mais en version robe ! Seulement je me demande ce que va rendre le pli devant. Cela fait très joli sur la blouse mais le pli devant aura t-il le même effet en version longue. pouvez vous me conseiller ? Robe ou pas robe !!
merci de votre retour
Cordialement