My tutorial ... my sixties Maïka dress

Here is the illustrated photo tutorial that will help you make the Sixties Maïka dress. This tutorial complements and follows the step-by-step instructions provided with the pattern available in our shop here: Maïka dress pattern.
STEP 1 - THE COLLAR
Start by assembling the collars and their facings right sides together as indicated in the first photo.

Carefully notch the edges, turn right side out, and press.
At this stage, you can add piping, which will enhance the collar's pretty rounded shape.
In this case, remember to sew the piping a little more than 1 cm from the edge to respect the seam allowances and to compensate for the width of the piping.
STEP 2 - THE FRONT BODICE
Assemble the center front bodice and the side front bodices right sides together. At this stage, you can also add piping.

You will get the front bodice as shown in the photo. (Here I chose to cut the center piece from the same fabric as the lining)

Press the seams towards the center front bodice if you added piping. Otherwise, press the seams open.
Place the collars made in the previous step on the top of the blouse, on each side of the center front, aligning the shoulder and neckline lines. (Here I chose to place the lining side of the collars facing outwards)
Baste the collars by stitching 5 mm from the edge of the neckline and shoulder.

STEP 3 - THE DRESS FRONT
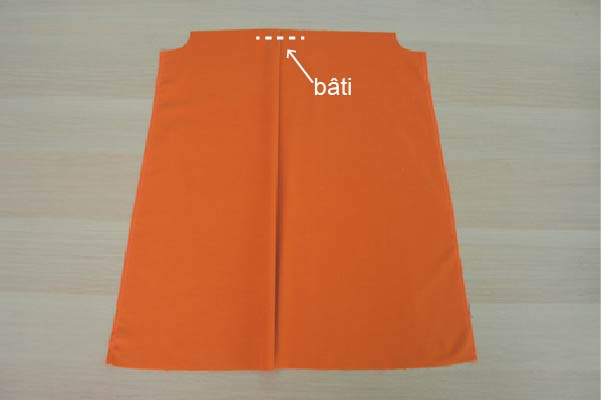
Form the inverted pleat on the lower front of the blouse. To do this, start by placing points A indicated on the pattern on the center line.
Secure the pleat on each side with pins and press carefully to mark it well.
Baste the pleat by stitching 5 mm from the top.
Then assemble the front bodice made in the previous step and the lower front, right sides together.

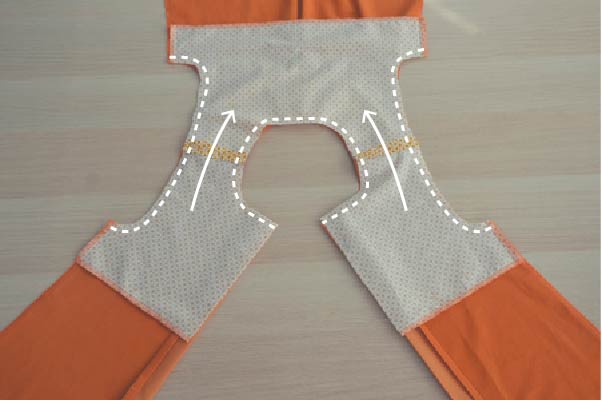
Press the seam upwards.
STEP 4 - PREPARING THE DRESS AND FACING
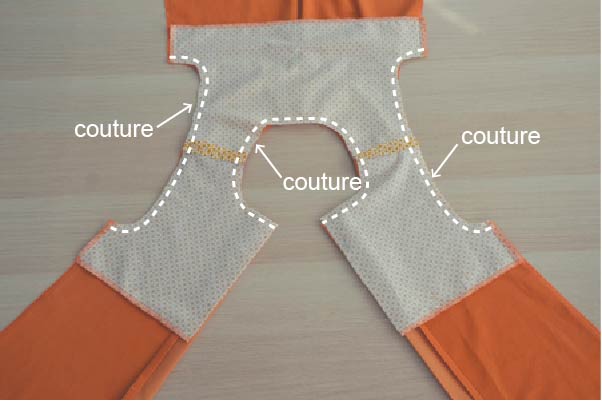
Assemble the front of the dress, made in the previous step, and the dress backs, right sides together, at the shoulder seams.

Press seams open.
Assemble the front facing and the back facings of the dress, right sides together, at the shoulder seams. (I have placed the pieces slightly offset here to clearly show the right and wrong sides of the fabric, but you should assemble the pieces perfectly aligned against each other)

Press seams open.

STEP 5 - ASSEMBLING THE DRESS
Press a 1 cm fold on each side of the back (fold towards the inside of the dress, i.e., towards the wrong side of the fabric).
Then press a 3 cm fold towards the outside of the dress this time (i.e., towards the right side of the dress).

Place the facing on the dress, right sides together, making sure the shoulder seams align perfectly. The folds of the dress back are at the "center" lines of the back facings.
Assemble them only at the neckline and armholes.
Reduce the seam allowance to 5 mm and make slits all around the neckline and armholes.
Turn the dress right side out, passing each back through the shoulders as shown in the photo.
Pass the 3 cm fold to the inside of the dress, over the facing.
Press the 3 cm fold inwards (opposite to its previous direction), along its entire length.

Carefully press all seams.
Assemble the front and back of the dress, right sides together, at the side seams:
Begin by aligning the armhole seams (under the arms)
by placing the front against the back and the front facing against the back facings.
Sew each side of the dress and, in extension, sew the facing.

Trim seam allowances at the armholes and press seams open.
Tuck the facing inside the dress.
STEP 6 - THE HEM
Unfold the bottom of the back center folds towards the right side of the dress:
that is, place the bottom of the back center folds on the right side of the dress as shown in the photo, and align the bottom lines of the dress.

Stitch the width of the fold 2 cm from the bottom of the dress only.

Before sewing this seam, I advise you to check that the lengths of the right and left backs are identical (a discrepancy may be due to an approximation during fabric cutting).
Cut off the excess fabric as indicated in the photo.

Press a first 1 cm fold at the bottom of the dress.
Press a second 1 cm fold.
Fold the center back folds to the inside of the dress.
Secure the bottom hem of the dress with small invisible hand stitches (or with a seam 2 mm from the edge of the fold).

STEP 7 - BUTTONS AND BUTTONHOLES
Start by securing the back folds with a seam 2 mm from the edge (make sure to position the facing correctly under the folds before stitching).

Sew the buttonholes on the right back and sew the buttons opposite them on the left back.
Happy sewing!
Lydie
1 comment
Merci